
Concrete Testing
Call us: +45 97 17 70 66
Introduction To Concrete Testing
Concrete Testing – Concrete is the most used construction material in the world but concrete companies are still getting it wrong, and it is costing them a lot of lost profit having to test cured concrete to prove it complies to the specification. This involves taking core samples and testing them.
Why waste profit and time when there is a much easier method?
A simpler way is to work to a standard process and test concrete using a concrete cube testing procedure.
Why Test Your Concrete Production?
Concrete is used to build structures, for example, foundations, structural frames, lintels, beams, columns and floors. An engineer used the structural strength of the concrete to design the structures.

Concrete Testing Equipment
For example, the engineer may use a C40 Mix for the design of a floor component. If the concrete is substandard, the floor could fail.
It is usually a minimum requirement from the client, that the concrete provider supplies evidence that the concrete meets the specification. The only way to do this is to test the concrete.
The concrete testing equipment you will need is:
- A bucket or wheelbarrow
- Wooden board / Polythene sheet or similar
- Cube moulds
- Tamping rod or vibrating poker
- Slump Cone
- Pen or marker to identify the samples
- Mound releasing agent and brush
- Scoop
- Trowel/Concrete float
- Tape Measure/Steel Rule
- Damp cloth
- Concrete curing tank
Concrete Testing Safety
Make sure anyone that is going to test the concrete are competent to do so. Make sure they understand the risks and have read the risk assessment and method statement. Concrete is mixed using hazardous materials.
Wearing personal protective equipment as prescribed by the COSHH assessment is required.
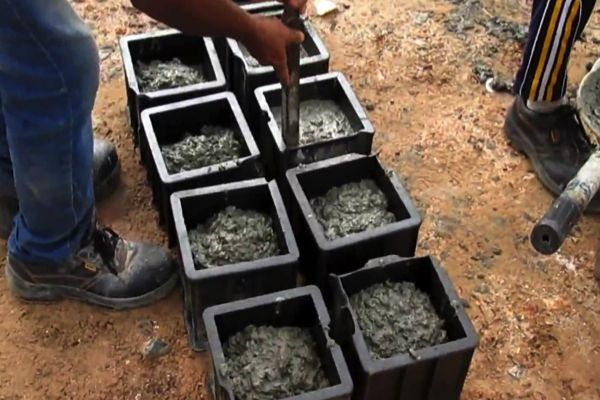
How To Take A Concrete Testing Sample
BS EN 12350-1 describes the correct method to take a sample. Take a sample after the first 25% of the concrete has been dispatched to ensure a good sample is taken. Take a few samples throughout the pour for the best representation of the batch. Take 150% of what you think you will need. The sample can be put in a bucket ready to carry out a slump test and to fill the cubes for the crushing test.
Concrete Site Testing
It is normal to take 3 cubes from each batch to be tested at 7 and 28 days. Check with the specification as the client or engineer may require more.
There are two sizes of cubes you can use for testing 150mm x 150mm x 150mm and 100mm x 100mm x 100mm. The normal size is the 150mm cube. They can be made from plastic or steel and need to be manufactured to BS EN 12390-1:2000
Prepare the mould by making sure it is clean and apply some release oil to ensure the concrete does not stick to the mould.
A 150mm mould should be filled in 3 number 50mm layers. Each layer is to be tamped 35 times with a standard 25mm x 25mm square rod. The rod is to be to the BS EN 12390-2:2009.
Finally, tap the side of the mould with a hammer to remove any air bubbles. Level off using a float or trowel to give a smooth surface.
Concrete Testing Cube Labelling
Label each cube with the date and a reference number. Log this information in a log book so the test strength can be added later.
Concrete Testing Cube Storage
The cubes should be stored in an environment at a temperature of 20 degrees +-5 degrees. The cubes can be stripped from the mould between 16 and 72 hours. They are then to be stored in a water tank with a temperature of 20 +- 2 degrees. Make sure the cubes are fully submerged. The curing tank ensures the cubes hydrate properly and the process is standardised to give the best results.
Cube Testing
The cubes are normally tested at 7 and 28 days. Check the specification as your client or engineer may want them testing differently.
Testing can be carried out by the contractor, concrete supplier but it is normal to have an independent third party to test the cubes.
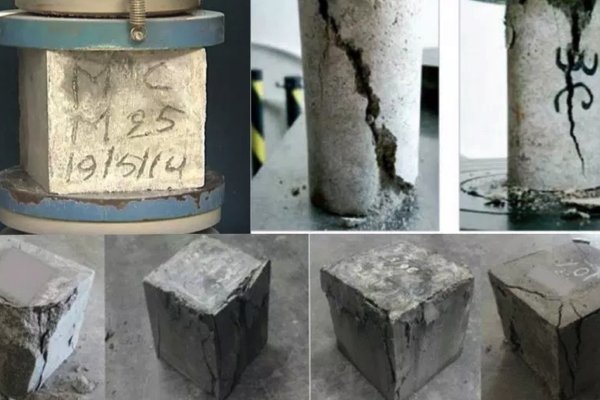
The cubes are tested on the face perpendicular to the casting face. The compression machine exerts a constant progressing force on the cubes till they fail, the rate of loading is 0.6 ± 0.2 M/Pas (N/mm²/s). The reading at failure is the maximum compressive strength of the concrete. BS EN 12390-2: 2009 / BS EN 12390-3:2009.
Once the cubes have reached failure, the shape of the cube has been altered due to the compression. The failure shape can indicate whether it’s a satisfactory/unsatisfactory failure. The image below shows the various failures of a cube as shown in BS EN 12390-3:2009.
Concrete Testing Cube Failure Diagram
Concrete cube testing as with all methods of testing, fresh/hard concrete are governed by standards set by the British Standards Institute and or the client in-house specifications. These standards specify all aspects involved in the process of carrying out tests, from the equipment to the method of testing.
A list of the National Concrete Standards relevant to Cube Testing are:
Fresh Concrete:
BS EN 12350-1:2009 – Sampling
BS EN 12350-2:2009 – Testing Fresh Concrete, Slump Test
BS EN 206-1:2000 – Concrete. Specification, performance, production and conformity
Hard Concrete:
BS EN 12390-1:2000 – Shape, dimensions and other requirements for specimens and moulds
BS EN 12390-2:2009 – Making and Curing Specimens for Strength Test
BS EN 12390-3:2009 – Compression Strength of Test Specimens
BS EN 12390-4:2009 – Compression Strength – Specification of Test Machines
More Concrete Technology Articles
Select The Batching Plant For Your Project
Let’s find your solution
Call us: +45 97 17 70 66